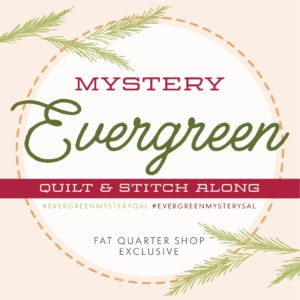
In 2023, I joined the Mystery Evergreen Stitch Along (and Quilt Along – see that post here). I love a good mystery stitch along, and since it seemed to match (from what I could tell from the teaser) was that it would match my 2022 Christmastime Mystery Stitch Along (see that post here).
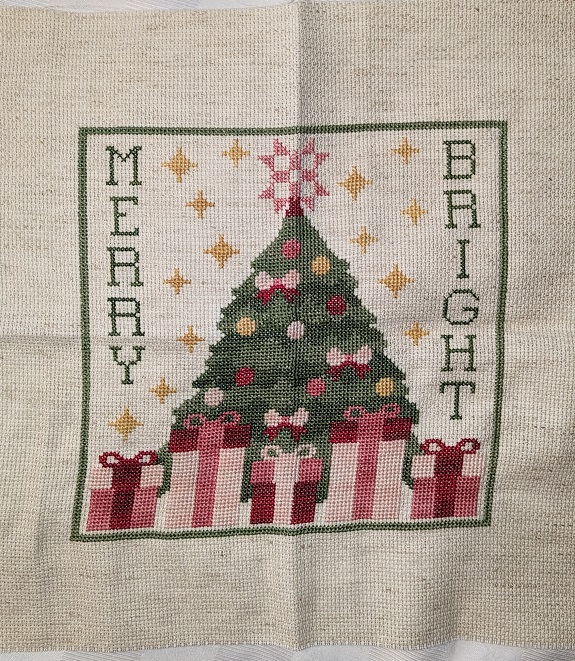
The pattern was released in 5 parts. I did not start it on time, though, so I finished it pretty much all at once. This is typical me.
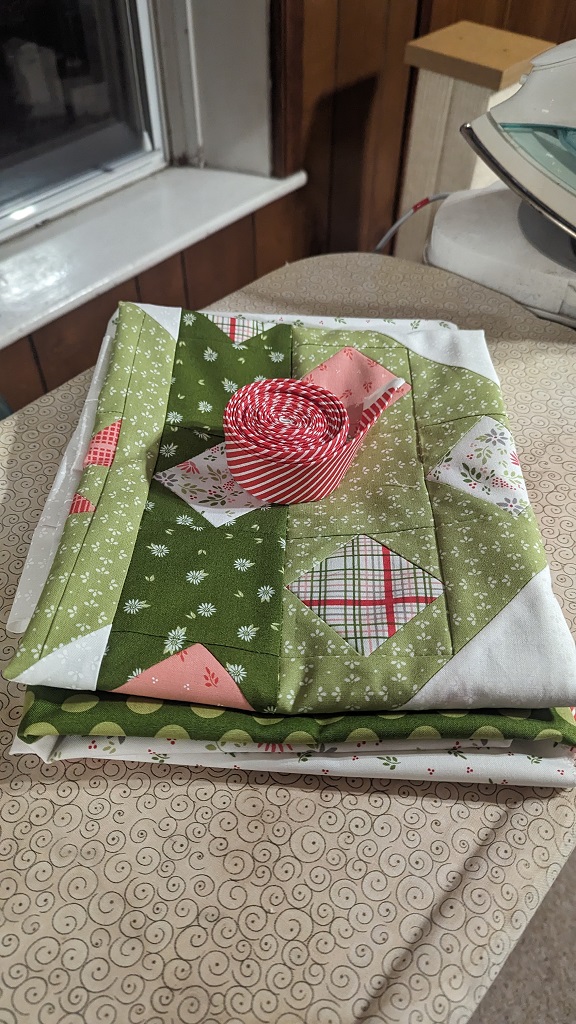
I love how it turned out. I did make a change to the pattern. The star on the top of the tree was supposed to just be the lightest pink, but I didn’t like how it blended into the fabric, so I took 1 strand of the light pink and 1 strand of the medium pink together to stitch the star. It turned out really nice and has a pretty variegation in person.
I finished stitching this piece at Bryce Canyon over Thanksgiving, 2023. We like to go there for the holiday: Thanksgiving dinner buffet; beautiful, scenic views; indoor pool (the kids like to swim); couches and tables for gathering with family and playing games. It is so fun there!
The weather over Thanksgiving was really snowy, so we spent a lot of time indoors, lounging in the guest common area. While the kids swam or played video games, I sat and stitched away on this piece and finally got it finished!
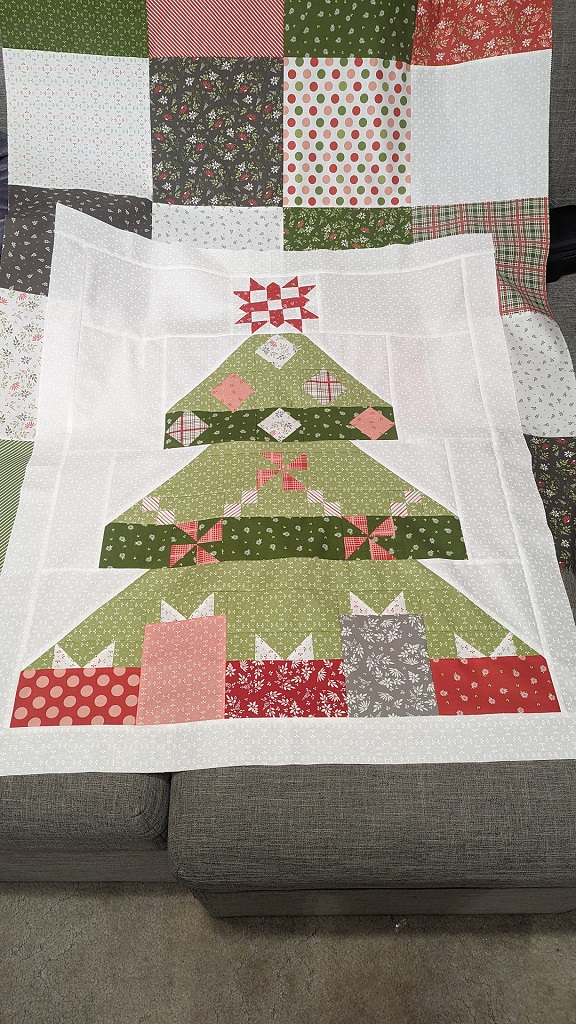
I joined the Mystery Evergreen Quilt Along (and Stitch Along – see that post here) last year. I kind of lost my quilting mojo in 2023, but as Christmas drew closer, I knew I wanted to jump back into some sewing/quilting but I wanted an “easy” pattern.
Now, nothing that has half square triangles (HSTs) is easy in my book. They are the bane of my existence! hahaha
But, I was able to pin, pin, pin. And . . . SUCCESS!
Didn’t it turn out so great?! The pattern called for stitching all the leftover layer cake squares together and then cutting it down. Instead, I measured the quilt top and just made sure the back was bigger.
This pattern was a really fun, quick, and easier-than-I-expected one to put together! Here’s the important information to know:
Free Pattern from Fat Quarter Shop. I bought the kit for this mystery quilt along, but you can use any fabric. The fabric we used isn’t even Christmas fabric. But doesn’t it work so well anyway?!
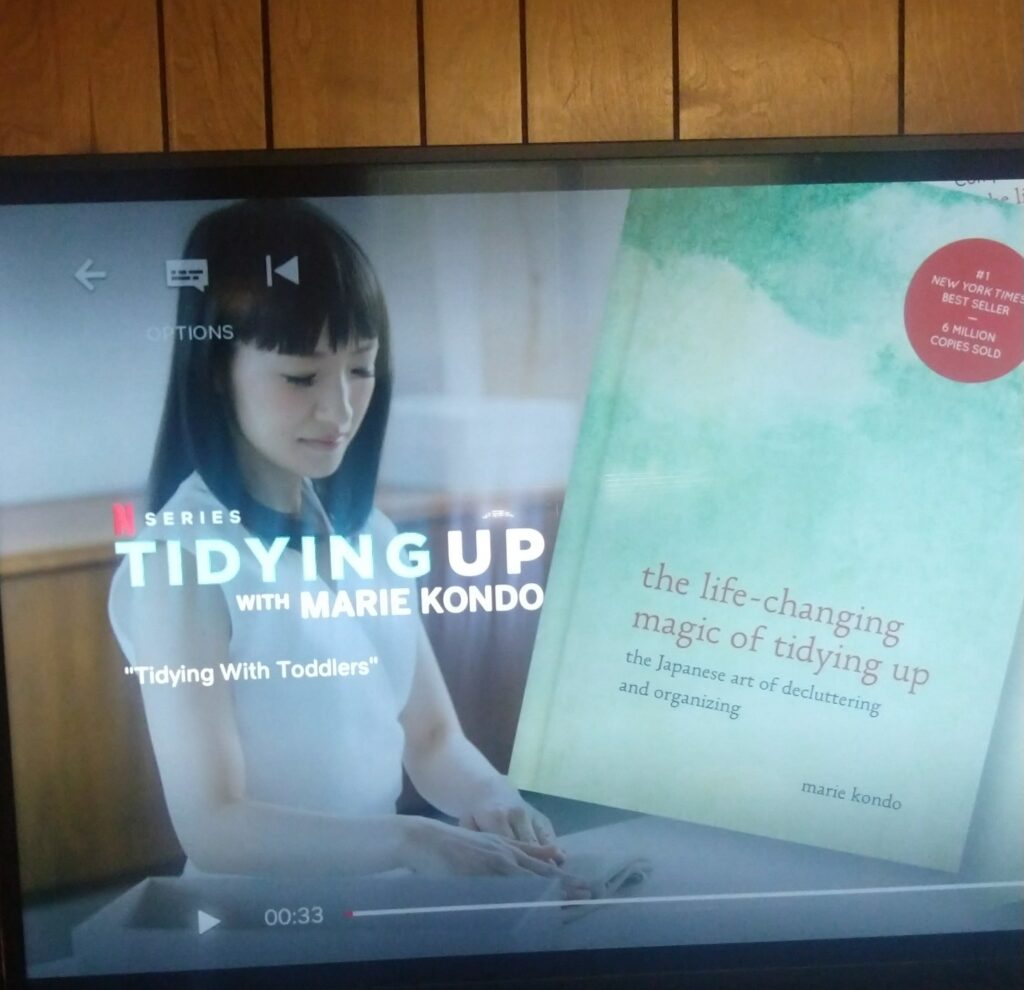
Who’s seen it? Tidying Up with Marie Kondo on Netflix? It’s all the rage. I’m not going to lie, I totally binged that show. And then I started in on my own stuff.
A little backstory first.
I did the Great Purge in September. I took an entire carload of donations to our local center (Deseret Industries, or DI for short). I took a dresser, 5 garbage bags full of toys, 2 garbage bags full of clothes, and some other random things. I purged A LOT.
And then we moved, and I had to pack the rest of our stuff up. I couldn’t believe how much we had left over! It was insane!! So, I decided that as we unpacked, I would purge more. Little did I know at the time, I was starting on the #KonMari method, without really knowing it. I hadn’t read the book yet, and the show wasn’t out.
Fast forward a few months. We’re still living in partial chaos. I have 8 boxes left to unpack. I’ve been trying to tidy as I unpack each box, deciding what we need, what we don’t, and what can just go in the trash. But, I couldn’t help but get started on my clothes. In every episode of the show, she always starts with the clothing. So, I decided to do that.
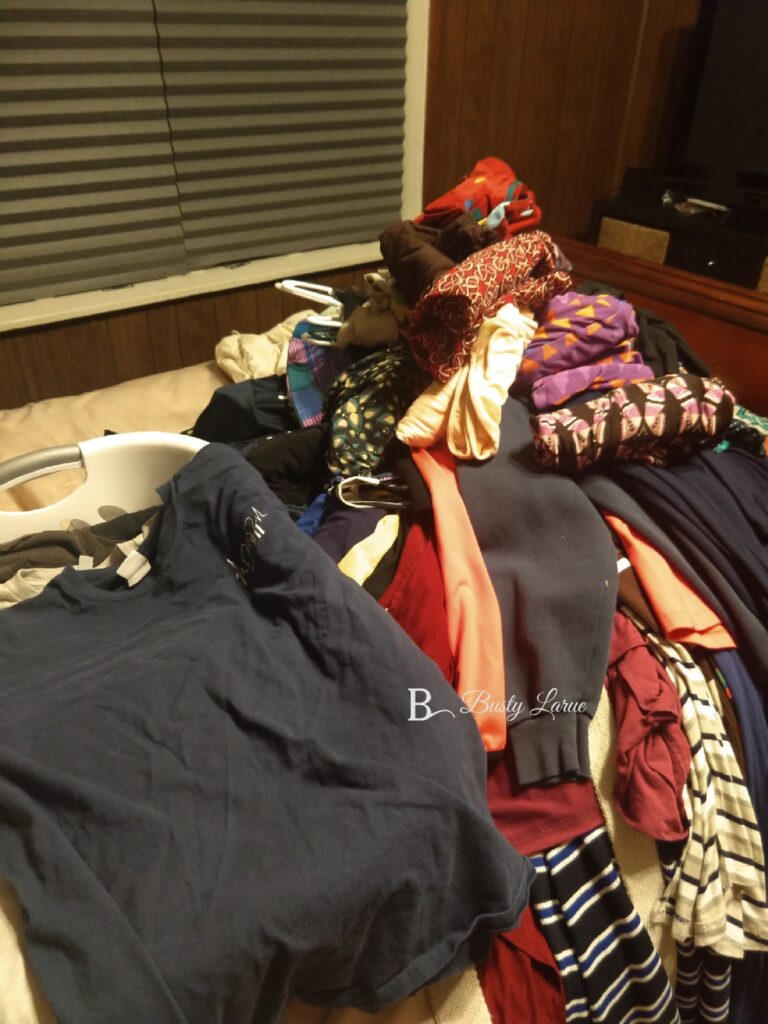
I started by piling all my clothes up on the bed, and dumping out my pants, leggings, socks, swimwear, etc. It was a lot. I was kind of amazed, because when we first moved in I went through all my clothes and got rid of about half of them. To think I had this much left was kind of astounding. I thought for sure I’d cleared out more than I did.
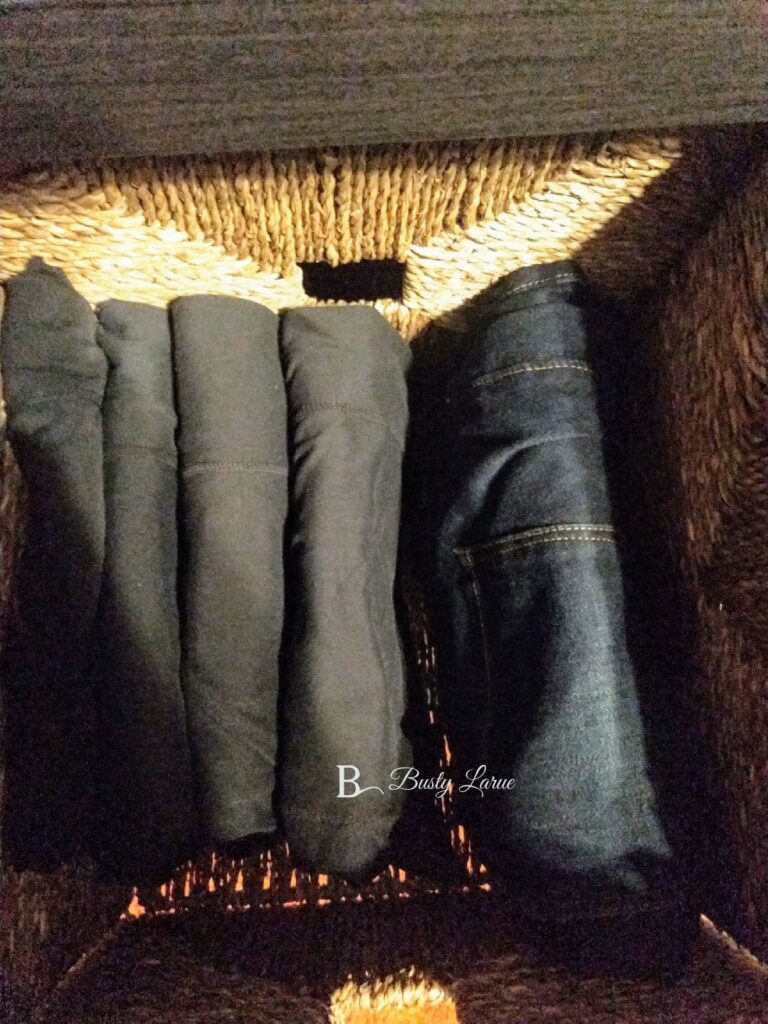
After hanging up all my shirts (I know, I know – it’s not truly #konmari if I don’t have my shirts folded. But, I don’t have enough drawers and most of them are happier hanging anyway.) I started in on my pants. I got rid of soooo many leggings. I had 3 pairs of black leggings and only really liked 1 of them. WHAT?! Why was I holding on to these things? I had a pair of pants from 11 years ago that still had the tags on them. They were my “someday” pants. But guess what? Someday isn’t ever going to happen and I’m totally okay with that. Someone else can enjoy my brand new, name brand jeans instead. I folded my leggings how she showed how to do it in the show. I used to roll my leggings up and stand them on end, but I couldn’t ever tell what I had; there were too many, and they were too bulky to shove in the same drawer. Now, they’re nice and visible. I can tell exactly what I have. And they’re in color order because….you can take the girl out of the retail but you can’t take the retail out of the girl!
Next I tackled my regular pants and jeans. Yes, I have 4 pairs of the same pair of black pants because they are comfy. I actually have 6, but 2 of them are in the mending pile to have seams repaired because I can’t get them anymore.
Next, I tackled the pajamas drawer. I got rid of anything that didn’t fit anymore, and anything I didn’t like. And then I folded the sets together, tops and bottoms, and then placed them in the drawer standing up so I can see them instead of having to dig for them each time. My clothing life was already starting to look soooo much better, so I kept going!
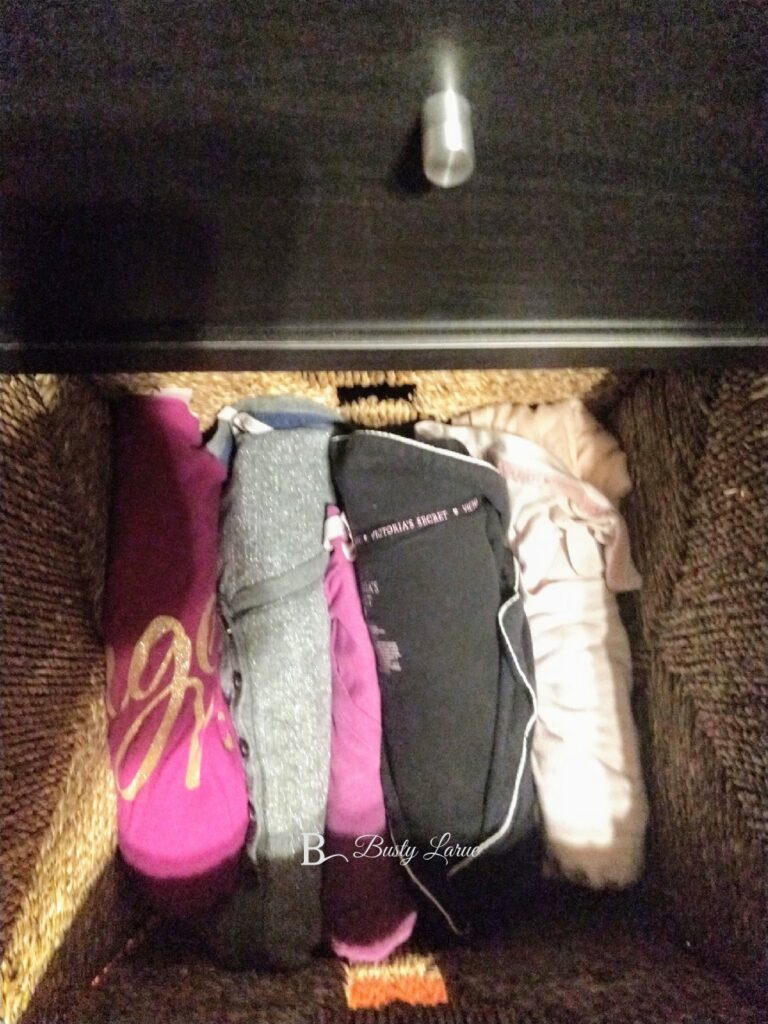
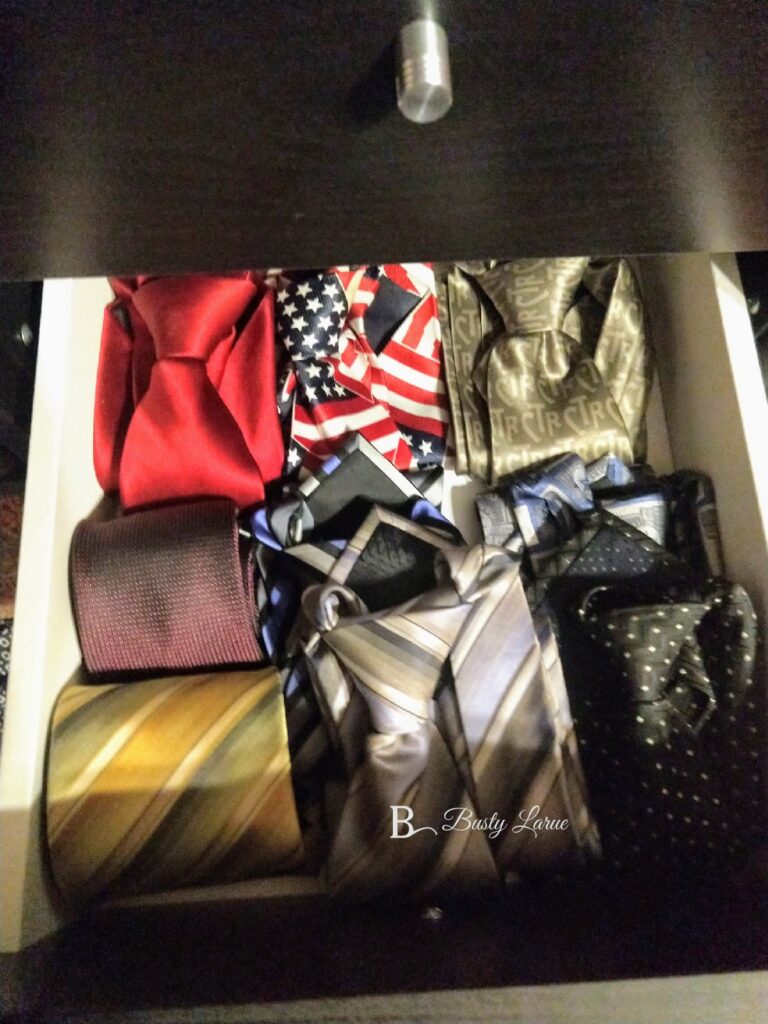
I organized my socks and swim wear. I had bathing suits I hadn’t worn in years. Socks with holes in them. Socks that didn’t have mates. I cleaned the drawer out, folded the socks how she said to, and continued on. I had every intention of stopping when I finished my clothes, but my husband’s ties were all a mess and I was tired of hanging them back up on the hanger, so I made him deal with those next!
Don’t they look so pretty?! We went from 40+ ties down to 9. I’m so proud of him. And now, instead of being squished on a tie hanger in the closet, they’re rolled up so nicely in this little drawer just for him. They’re easy to find, and stay neat, too.
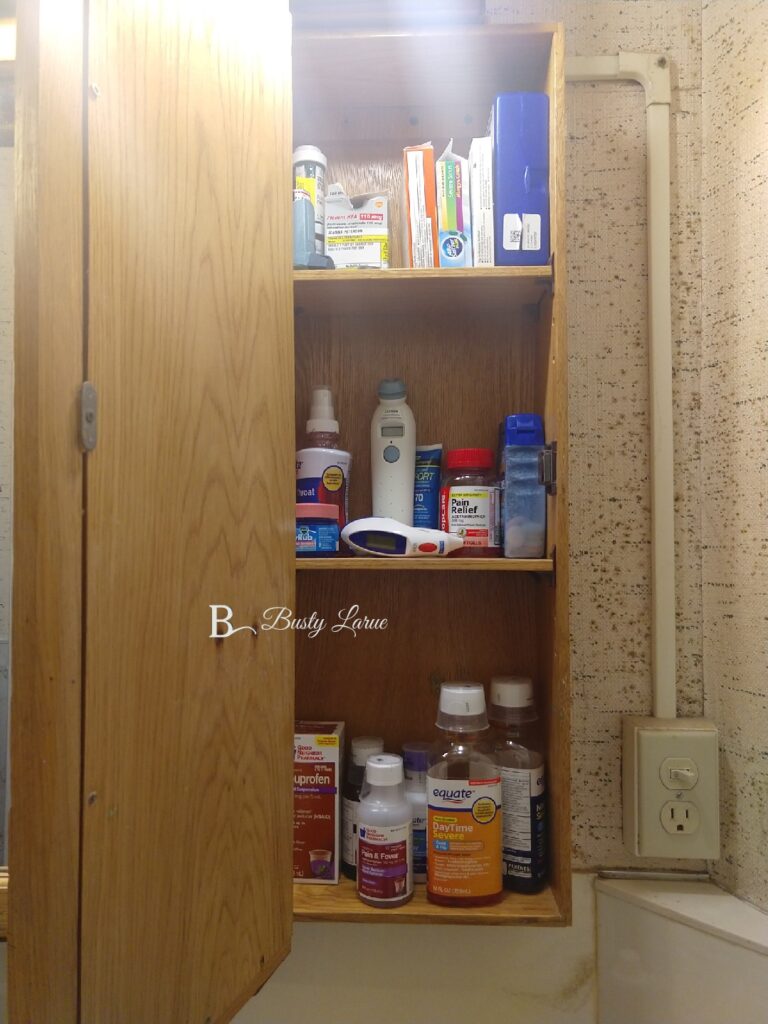
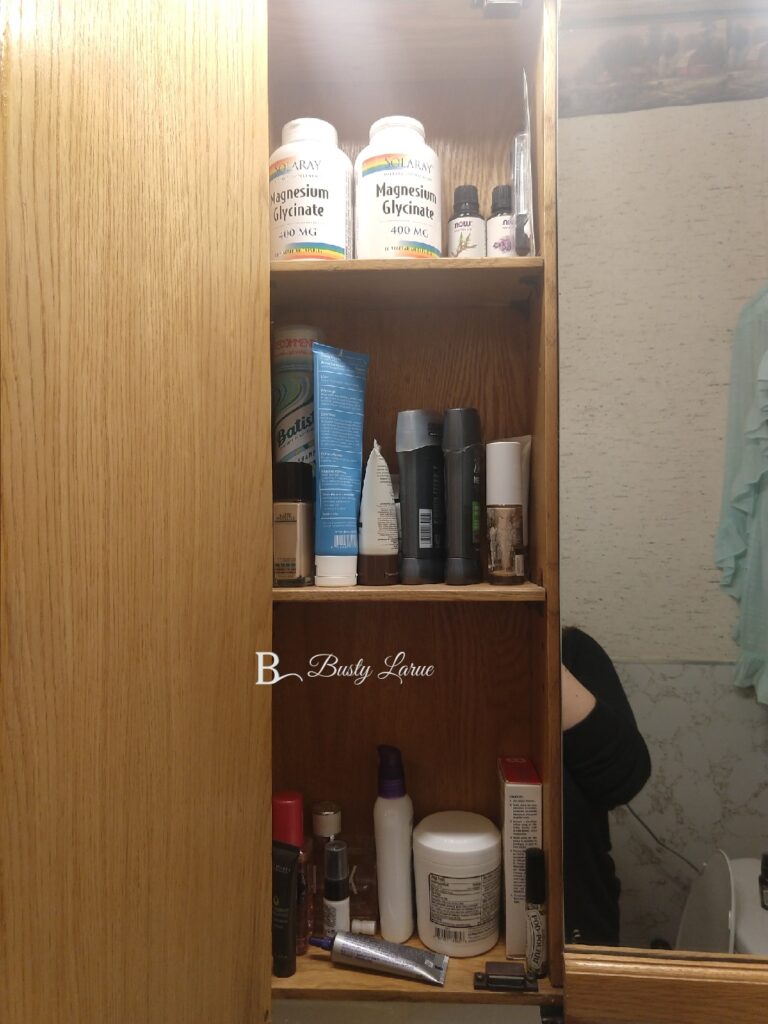
I couldn’t be stopped. I was on a roll! I decided to head to the bathroom next. I’d already unpacked the bathroom, and thrown some things away as I did, but I decided to go through the medicine cabinet and the drawers and clean out some more.
Our medicine cabinet couldn’t close on this side, we had so many medications inside. Looking at bottles, quite a few of the over the counters were expired, as well as a TON of prescription meds we’d been holding on to. Luckily, we live near the police department, so I was able to run those in to the RX Drop Off box there to be safely disposed of.
I cleaned up my portion of the cupboard, with my perfume and face cleaner on the bottom, and my other essentials within easy reach.
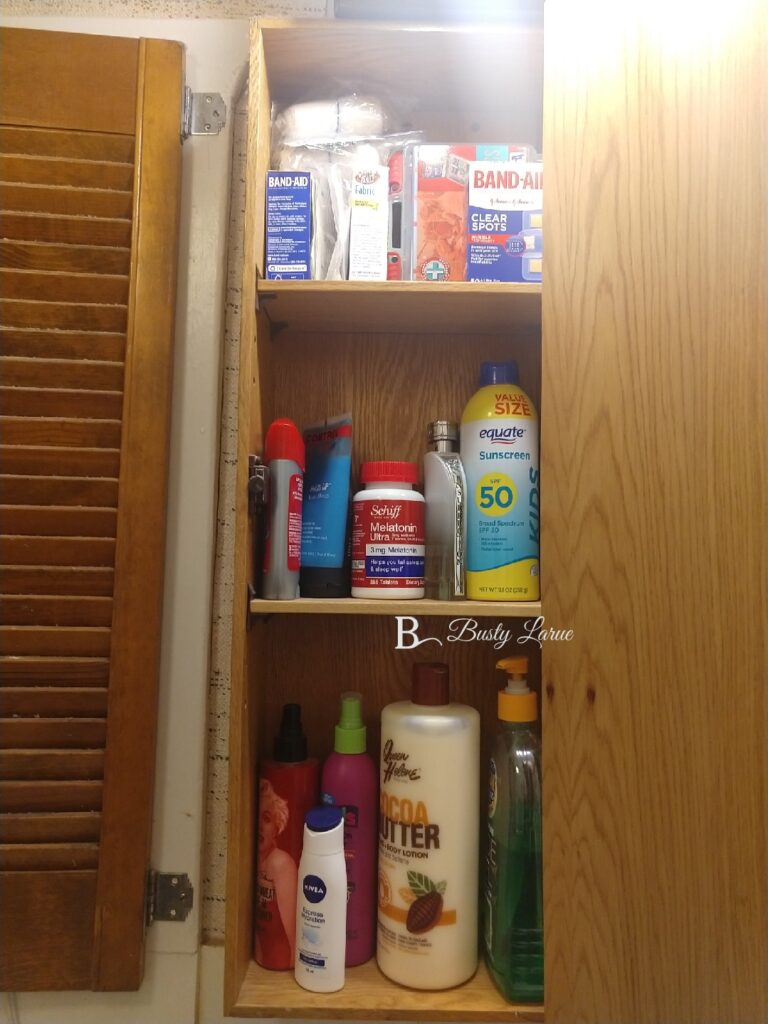
In the last side of the cabinet, we keep first aid supplies (I paired those down. We had 4 boxes of band-aids with only a few band-aids inside!), sunblock, lotions, and some hair products. It used to be much more cluttered, but we kept only essentials.
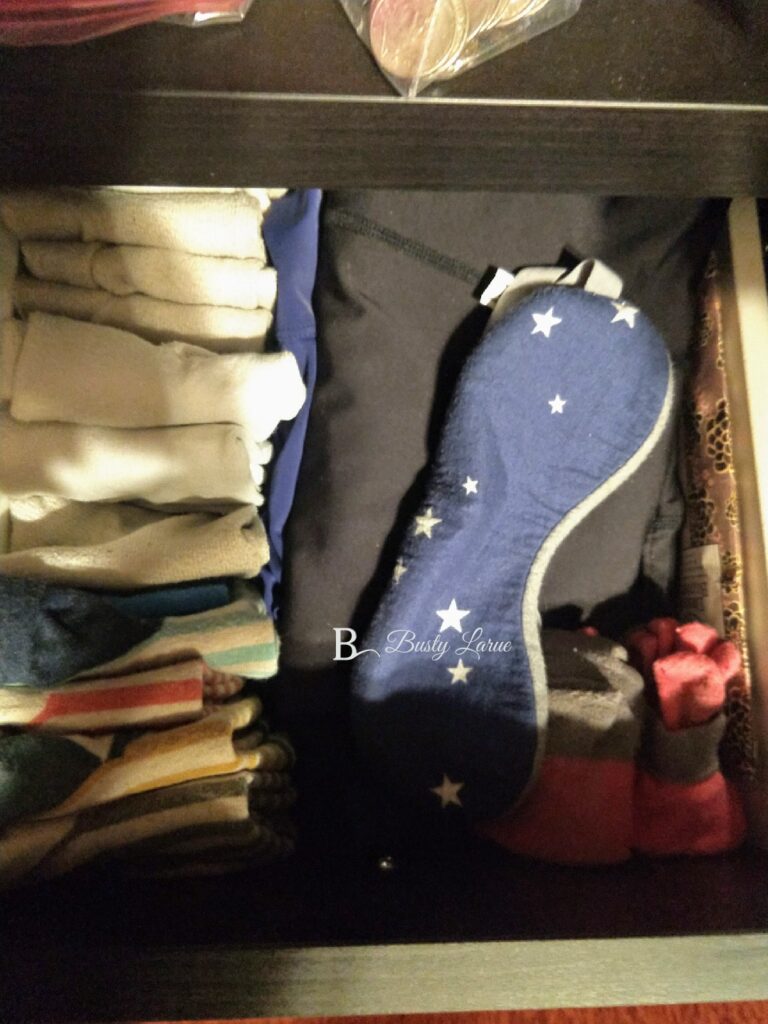
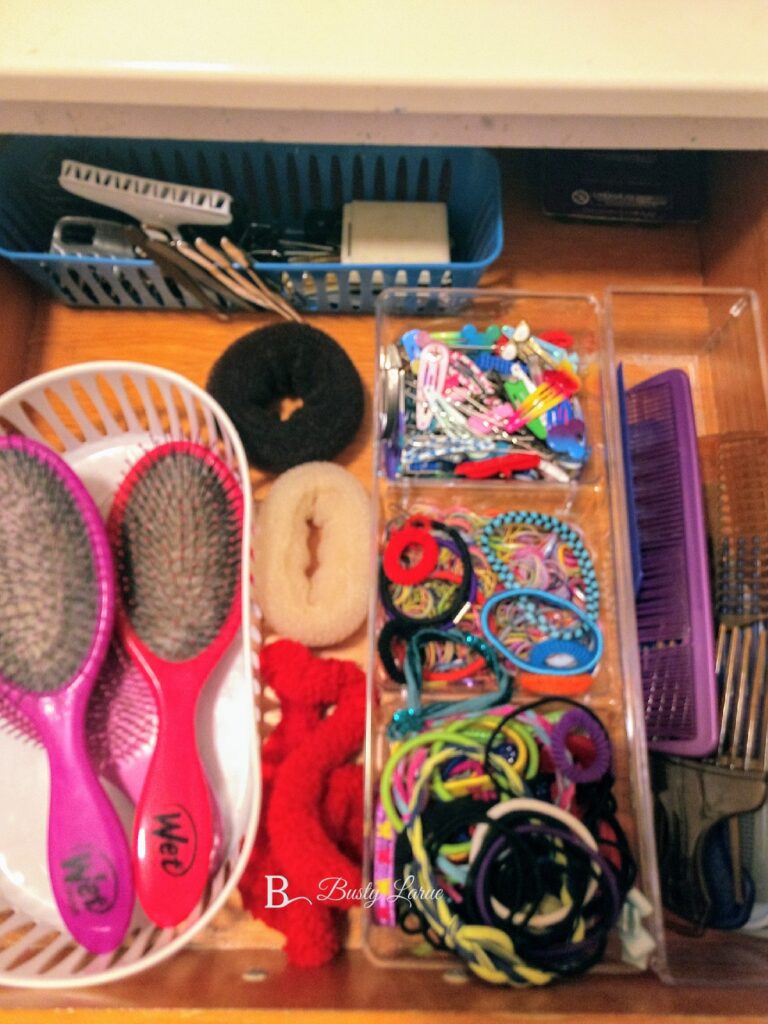
I tackled the drawers next. At our old house, I’d been using baskets and containers to separate hair things to keep the drawers more organized. Little did I know I was already following the #KonMari way! These drawers are much larger than our last house, so the containers really help keep things neat and tidy.
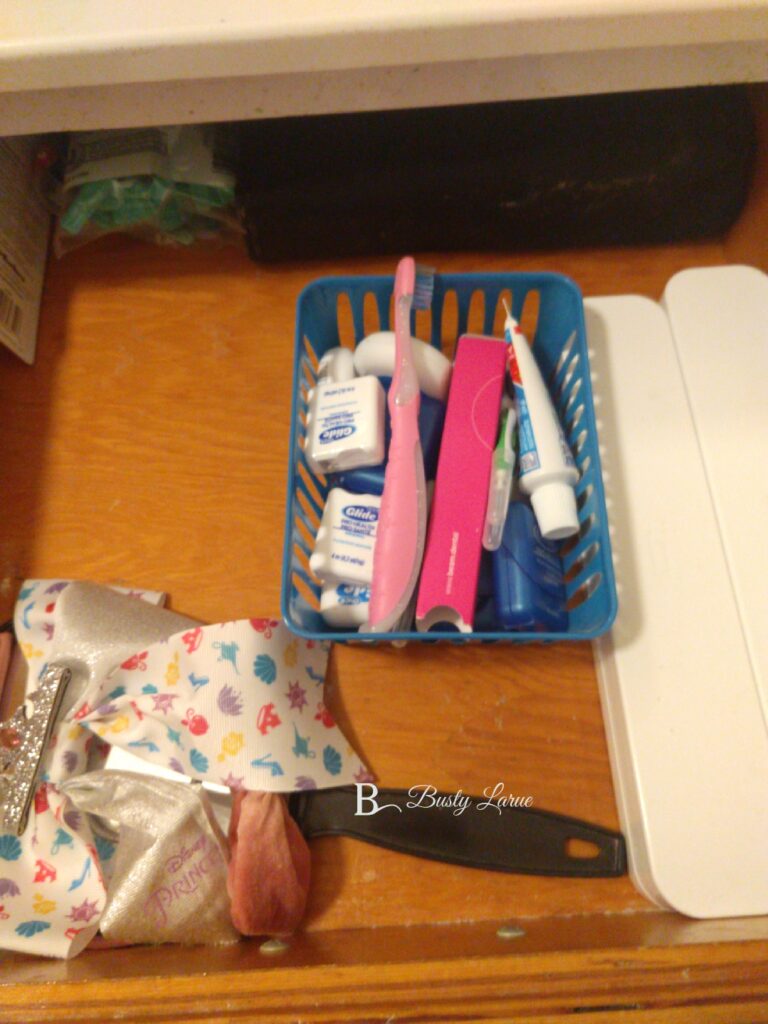
And of course, now ALL of our floss is in the same place! I swear, we won’t need floss for years! (I know, I know, #KonMari says to throw out the excess in her book – I’m getting there!!)
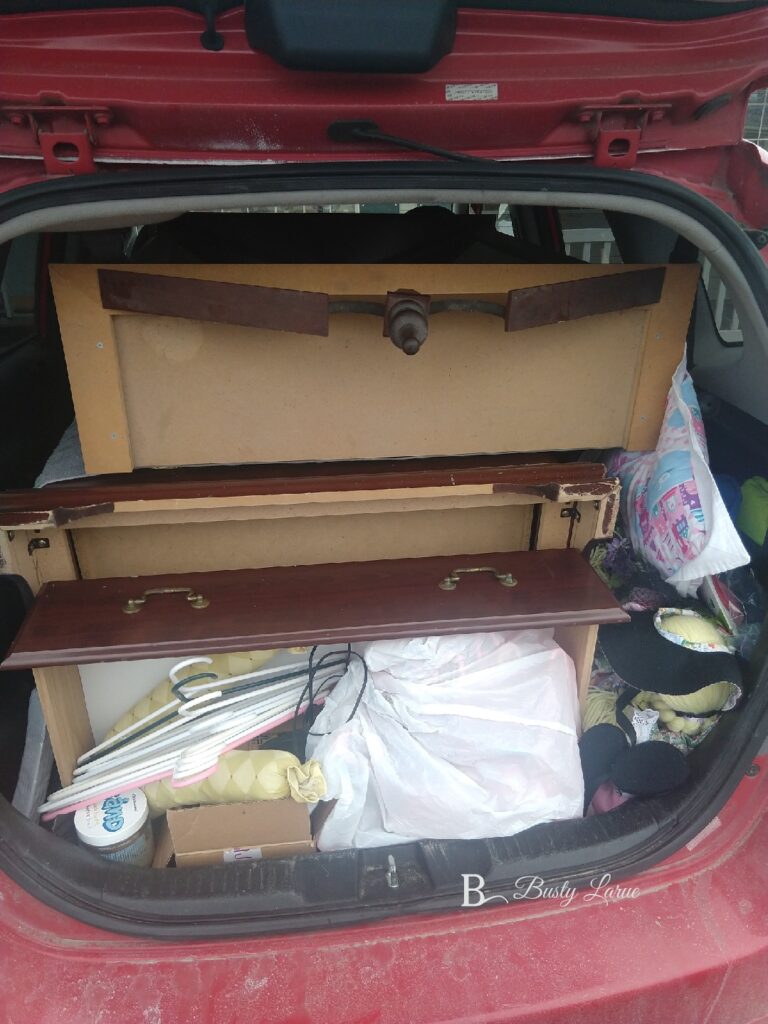
And here’s what I ended up taking to the DI in February. I’ve been every month since we moved, and the car is always this full. And yes, that is a desk shoved in the back there of my Honda Fit. It fit in the Fit!
I’m reading her first book now. It’s fantastic. I’ve learned so much, and can’t wait to get the next book.
How are you tidying up? Do you like her method? Or do you use something else? I’d love to hear about it in the comments!!
What brought this up was that new Tidying Up show on Netflix. Have you seen it yet? I started watching the first episode. I was folding laundry, and the wife of the featured family says “I just hate doing laundry, so we pay someone to do it for us.”
Say what?
That’s an option?
Also, how much does this cost, because as I sat there folding 4 baskets piled high with clothes (apparently my children wear three to four outfits a day!), I was seriously considering outsourcing the job.
This is the biggest issue I have with laundry. The care label. Everything has to be washed differently:
Cold, no bleach, delicate cycle, dry on low
Warm with like colors, hang to dry
Cold with like colors, tumble dry low, remove promptly, do not iron
Dry clean only
Dry clean preferred, or delicate cycle, line dry
These last 2 are the ones I hate. I don’t dry clean anything. I know we have dry cleaners in the next towns over, but there isn’t one here in town. And guess what? I’m not going to drive over there for the 1 dress that someone gifted my daughter. Nope. It’ll just keep getting worn until she spills something on it or outgrows it and I can donate it to the thrift store. Because I’m inherently lazy when it comes to laundry, and having to leave my house to have 1 item cleaned makes me insane.
So what do you look for when you buy clothes?
I look for machine wash cold, tumble dry low. I can manage that. And honestly, nothing really gets dried on low at my house. It all goes in the dryer and gets set on regular until they’re done. (Except bras and tights. They don’t go in the dryer. They hang to dry.)
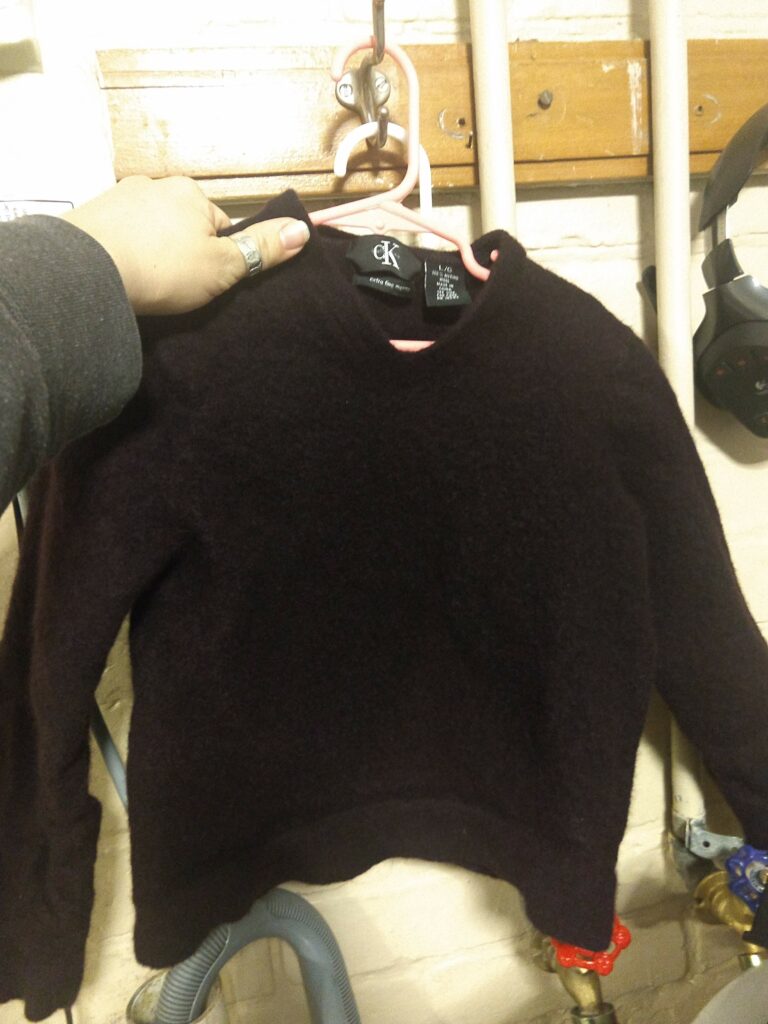
This sweater is why I hate differing care label instructions. My husband was gifted this for Christmas a few years ago. Somehow, it ended up in the laundry hamper and I didn’t know it. I put 99.9% of the clothes in the hamper, so I typically just pull them out and throw them in the wash. If something has specific care instructions, I have a separate hamper for those. Like I said, I put the clothes in there, so I figure I know what’s in the hamper. Somehow, this sweater found its way into the wrong hamper, and I washed and dried it. (It’s 100% wool. Go ahead and cringe now.)
I felt super guilty it didn’t fit my husband anymore, and I’d ruined a perfectly good sweater, but I couldn’t bear to throw it out or give it away. So I held onto it and completely forgot about it until we moved. I pulled it out, and was ready to donate it when he suggested we give it to Mr M to wear to church. Guess what happened 2 weeks later? Mr M decided he’d worn it to church twice and it needed to be washed.
He didn’t tell me.
Because I put 99.9% of the laundry in the hampers (my kids make it to the doorway – I don’t know why the extra 3 steps are so hard to make), I dumped the whole hamper into the washer, and then dried the entire load.
Go ahead and cringe again. Remember, it’s 100% wool?
The photo above is how it came out. It probably fits my 7 year old. I haven’t tried it on her yet, but it looks like it’ll fit as maybe a cute crop top? Also, it’s practically bulletproof at this point, so it’s got that going for it.
Huge props to the moms and dads who sort and do 90 different loads of laundry by care tag instructions. That’s just not me. And this story is proof of that.
So I want to know: How do you laundry? Do you follow the care tags? Or do you just throw it all in and hope for the best? Let me know in the comments!
Happy New Year! I love the new year. It’s like a clean slate. I have 12 whole new months to totally set new goals, and screw them up. But at least I’m setting them, right?!
Usually, I’ll set a million goals that are completely unattainable. This year, I decided to set a small handful, and then add in as the year progresses. I tried to think of 3 goals that would provide meaningful change to me and my family. These are my main 3 goals that I’ll focus on throughout the year.
My first goal is to have more meaningful scripture study. This year, our church is focusing on daily scripture study with our families at home, supported and enhanced by lessons at church. We are studying the New Testament this year. If you’d like to join us in our weekly study, you can see this week’s material here. The Come Follow Me program put out by the Church has really been a great program. We got together at the start of the year as a family and decided when we would study together. The kids decided that they would wake up at 6 AM every school day to study with us. So far (and we’re only in this thing 2 weeks) they have done it. Miss B wasn’t feeling well the other day, and they didn’t have school, but they still got up and sat down and we did a mini review for about 20 minutes. Some days we study for 15-20 minutes, and some days we can go for about an hour. It just depends on the day. But, we’re doing it! Of course, I have a little help from some amazing online resources. The Red-Headed Hostess has a subscription service where you get study kits to help you teach each week’s lesson (you can also just buy the kits you want/need on her site). She also has amazing workbooks, study guides, lesson journals, and other helps. You can find them on her site, or buy them with Prime shipping off Amazon!
My next goal this year to is to pay off most of our debt. I have a 5-year plan that includes building a house on our property. It’s been our 5-year plan for about 14 years now, but we’ll get there! Now that we’re actually living in the city we want to be in, in a house, we’re getting closer. Now we just need to be in our house. But, to do that we need to pay off our car and our cards. I’ve made a fairly aggressive budget to do this, and it’s been hard so far! We’re only 2 weeks into the year and I’m already struggling. I’m so used to being able to buy lunch whenever I felt like it at work. Now, I have to actually eat the food I brought from home. But, it will be so good to be out of debt!
We’re taking a modified approach of Dave Ramsey’s Total Money Makeover. If you haven’t read that book, you should. It’s a great read. He stresses the importance of building up a $1000 cash emergency fund first. We aren’t doing that. We’re going to work on eliminating our debt snowball first. Basically, you pay off the lowest balance cards first, and roll those payments into your other monthly payments for higher balance cards. While I am planning on applying some, if not all, of our tax refund to some cards, I fully expect to have the bulk of our lower balance debt paid off by July of this year! It’s going to be hard, and we’ll have to stick with it, but it will be so worth it when we’re done!
My last main goal for the year is to get everything unpacked and organized. I still have 16 boxes left from our move. Most of those are board games, card games, and files from my desk. I used to have this old secretary-style desk, but it just became a catch all for anything and everything that no one wanted to put away where it belonged. So, I’m donating the desk to the local thrift store (if it will fit in my car, but that’s a post for another day!). Eventually, we’ll buy some desk pieces from Ikea. We’re thinking of just buying some desk tops and legs, and making our own 2-computer desk for both of us to sit at. But, we’ll see when we get to that point.
In the meantime, I purchased a half file cabinet from the thrift store for $15, and I’m going to put all my files in there (that’s 1 box). Eventually, all the files will be scanned into the cloud and I’ll be able to shred the hard copies. With Mr M’s medical issues, I have literally kept 12 years of medical records in my file drawers. I’d love to be able to – someday – get those all scanned and uploaded into the cloud. And that goal falls into the “organized” part of this last main goal.
The kids’ rooms are also kind of a mess. They used to share a room, so we had 1 dresser, 1 toy organizer, 1 table and chair set. Now, we’ve had to split the furniture up between them. We bought my husband a new bedside table, so we took his old Sterlite drawer set and moved it into Mr M’s room to put toys in it. Has he? Nope. How long has he had it? About a week and a half. *sigh*
So organizing the house, unpacking everything, and putting the stuff that needs to go down into the cellar storage area away are all on my list. And of course, cleaning, because no matter how clean you think a place is when you look at it, once you move in you find that it just isn’t.
I have a few other goals that I’ve made that are less important, and I’ll touch on those in later posts. For now, thanks for reading! And comment with your goals below! What is important to you to achieve this year? If you made more than 3 goals, what are your top 3?
I know, I know. It’s been a really long time since I’ve been on here and written anything at all. I’m sorry about that. Really, I am.
It’s been a crazy few months around here! September was rough. I started working graveyards at my “day” job. I love working the graves shift, but my family hates it so much. I get it, I do. I sleep all day, I’m up all night, and I’m practically a zombie on my days off – if I’m not prepping to work an on call shift. September was a rough adjustment month. Of course, by the time I started feeling normal on graves, my 3-month term was up – but more on that later. September, my son turned 12! Oh my gosh, he’s almost a teenager! He has the attitude to match, for sure. He’s gotten so moody and hormonal lately. I am not prepared for this. At first I wondered if maybe his meds were off, but his doctor assured me all was fine and this was “normal.” Um, okay? I guess?
October I decided to be super woman and hand make my kids’ Halloween costumes. What was I thinking? Not only was I halfway through my graves shift, and a walking zombie, but we also had family come visit for 4 days in the middle of the month. Miss B begged and begged and begged to be Moana for Halloween. I looked at all the costumes at the stores, but they were all really cheap looking – even the $50 one at the Disney store – so I decided I could probably whip something passable up with my sewing skillz. I bought some stretchy/gauzy fabric (honestly, I’m not even sure what it was, it was just the right color and in the apparel section at Joann’s), and some canvas and beads, and got to work.
The first step was to make the grass skirt. I went to my local floral and bought a yard of jute (after measuring my kiddo’s waist – bigger waist, you’ll need more jute, just sayin’) and a package of raffia. I did not need the whole package of raffia, but it was nice to have the extra just in case. I followed the same wrapping technique I show in my Independence Day Bandana Wreath tutorial to wrap the the raffia around the jute. Basically, the jute is acting like the waistband, which you’ll tie around the wearer’s waist, and the raffia is making the skirt.
Next I figured out how to make the top and sash. Basically, it’s just a tube. I did leave the back a little longer at the top, in case I needed to add straps to help keep it up, but ended up just folding that over to the inside, and sewing some elastic into the top between the folded fabric and the back side. It sounds confusing – it was. I seriously made like 3 of these stupid tubes of fabric before I finally got it to the shape and size I wanted. My biggest suggestion would be to make sure you cut it big enough it’ll stretch over her head/arms, but tight enough it won’t fall off her every 5 seconds. I did buy a nude-colored t-shirt for her to wear underneath, just for added coverage, and that helped with the fit as well. Also, remember that I did this whole costume for like less than $40 at the time, so I was running on a budget and wasn’t trying to make it all fancy. Yet (we’ll get to that part of the story soon enough!)
I used Tulip brand fabric paint in a brown to do the painting. And, I used foam brushes. I bought a pack of assorted sizes and found one I liked to do the design at the bottom and top edges, and then just used a bigger foam brush to fill in the design across the chest in the middle. It was a lot of painting. And yes, I painted after I’d sewn the fabric into the top, to make sure that everything lined up the way I wanted it to.
I strung the beads on last, using a brown thread. There’s a teeny, tiny stitch between each bead. So, I came up from the back of the fabric, put a bead on, then went back down super close to the edge of the bead, then came back up really close to where I went down before stringing another bead on. That gives it the look of being strung closely together, but also holds them in place. One thing I did notice was that between wearing it all day at school and going to Trunk or Treat that night, one of the knots popped through the top of the fabric and we lost a bead. NBD. It still looked fine. And it’s an easy enough fix. I bought a couple of sets of strung beads from Joann’s for this, and I had some extras left over so I can fix it if she wants to wear it again next year.
For the sash, I cut really long piece of the fabric I used for the top. I only painted on the one edge, because the plan was to fold the sash in half before tying. I believe the fabric I used was 60 inches wide, so I just cut a 6 inch wide strip of that, but I don’t remember for sure – and I’m too lazy to go pull it out of the costume storage bin in the other room to check. Sorry! Really, just wing it. Whatever size you’re going for, just make sure you have plenty of length to wrap around the person’s body, knot it, and have some sort of tails to hang down for effect.
Once the top and sash were done, I set to working on the skirts. Yes, skirts. If you’ve ever seen Moana, she has 3. The grass skirt (which we’ve already made) and 2 other skirts. 1 is shorter, and 1 is longer. Both have a chevron edge and decorative stitching/painting on them. I seriously spent hours studying close up images on the internet of her skirts. Like, it was a lot of time. You’d think I was trying to make it historically accurate or something. Anyway, I ended up using a natural colored canvas fabric, and cut the skirts a little bigger than needed. I used velcro to fit them down to Miss B’s waist later. I cut the triangle shapes and the cut-outs out first. But, hindsight is always 20/20, and I probably would do the stitching first and the cut-outs second next time around.
Yes, you read that right. Stitching. I was initially going to paint the designs on and call it good, but I thought it would look better if I stitched it all using embroidery floss. I spent so much dang money on floss. Seriously. I wiped my local Joann’s out of white and yellow not once, but twice. Yes, twice. I actually ran out for the last flower on the larger skirt and had to use a slightly lighter yellow. It ended up being fine, but I know it’s different, and that bother’s my OCD just a little.
As you can see, Miss B is modeling this thing and she looks just too dang cute! It ended up fitting quite well, but I didn’t think the whole going to bathroom thing through all the way. Poor kiddo couldn’t go potty all day at 1st grade without worrying if her grass skirt was going to fall in the toilet. If I did it again, I’d probably make an under layer that would assist with this problem, so she wouldn’t have to take it all off just to go. But, I’m probably not going to make it again. HAHA
So I finally get Miss B’s costume done, after hours of stitching through stiff canvas and I literally had no fingers left, when family comes to visit in October. The week before Halloween. And of course, Mr M decides to change his mind 8 million times about what he wants to be for Halloween. He finally settles on Luigi, and I go buy a pattern to make the overalls. But guess what? I get the pattern all cut out to the XS size, and it’s long enough to fit my husband! WTH?! So I totally scrap that and decide to just run to the thrift store to see what I can find. Bless whoever made Mario/Luigi costumes and donated them that year, because I found a pair of homemade blue overalls that fit the child, and a solid colored red t-shirt. Yep. Red. Because by this time, I didn’t have time to make a green hat that said “L” on it, and Mr M already had a red Mario hat so…..there we are. He got what he got, and he was sad for a minute. I also bought a pair of white gloves at the Dollar Tree to finish the costume off.
Don’t they just look so cute?! As you can see, on the Moana costume, I chose not to make the necklace. I got super ambitious and thought about it for like 2 seconds, until the skirts took 90 million years to stitch. So instead, I bought the wig at Walmart and the necklace off Amazon. The wig is insane. That hair went everywhere!
So, after all’s said and done, I probably spent as much (more) on Miss B’s costume as if I’d bought the deluxe $50 Disney store one. But, I made up for it on Mr M’s costume, because the thrift store came through and it literally cost me $8 for the whole thing!
And that brings us to November. At the beginning of November, we were given a tip about an awesome house in an older neighborhood of the city my kids’ school is in. It is literally up the street from their school. The rent was less than what we were paying already, and it was a 3 bed 1 bath (as opposed to the 2 bed 1-1/2 bath we were living in) with a huge car port, cellar, and tons of storage space. Did I mention it had a fenced yard? Yeah, it was like a dream come true. Only problem? There was someone else ahead of us in line, and they decided they wanted it.
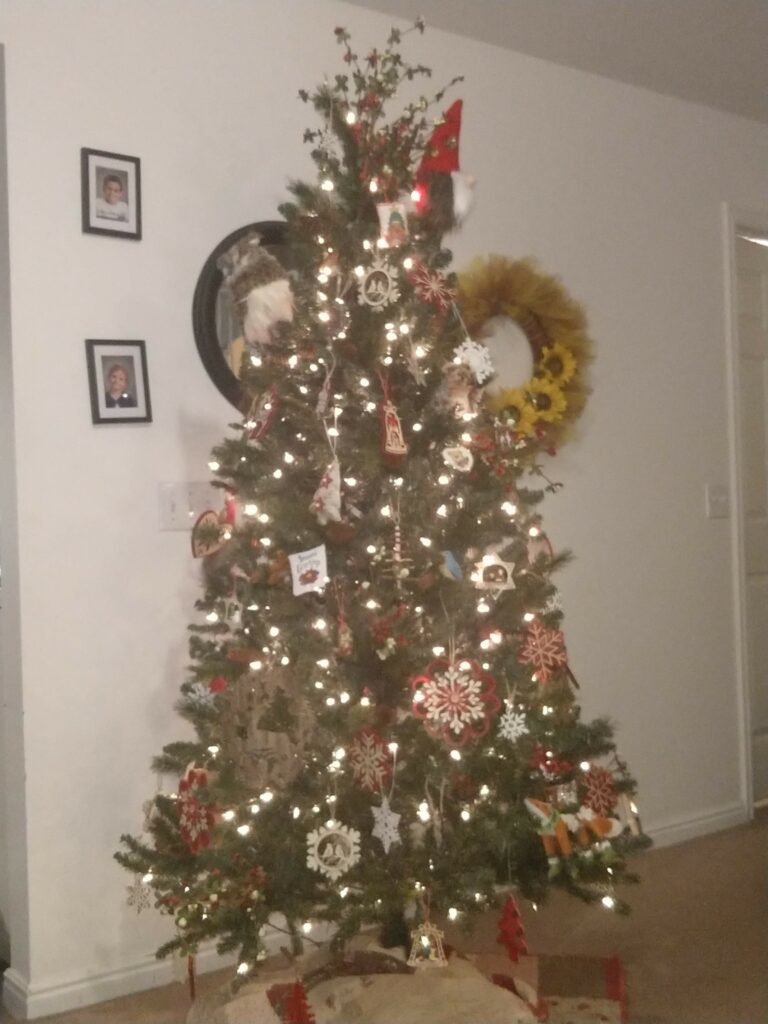
I got all depressed because we didn’t get the house, and put Christmas up on Election Night (because that was depressing as well). My tree looked so dang cute!
We went on with our regularly scheduled lives, and then, the week before Thanksgiving, I woke up for my graveyard shift to find a text: “Hey, the other couple fell through. Do you still want the house?”
Ummmmm….YES! So we rushed over, took a look at the house, said we wanted it, and started the approval process. So, here’s the sitch with the house: It’s owned by the city. So the council has to approve tenants. NBD. I work at Dispatch for the PD, my husband is a native, and we both have major ties to the community. My mother-in-law literally knows everyone in town – or at least most everyone in town. So we had to wait for the next council meeting which was . . . . wait for it . . . . . the day before Thanksgiving. Council meeting comes, we get approved, we sign the lease, and I text my current landlord that we’ll be moving out.
Here’s where things got tricky for us. We’d lived there for nearly 10 years. We were the longest tenants they’d had. And, the swamp cooler (which had been removed when they installed an AC unit on the side of the building) had been leaking for maybe half of that – at least. We’d called and texted and complained, and every time they’d told us there was nothing more they could do. “We’ve been up there and can’t find the leak.” “We’re selling the building as-is and aren’t going to put any more money into it. You’ll have to bring it up with the new owners when the sale goes through.” Yeah, that last one was what we heard in October. With every rainstorm, I’d sit at work and wonder if I’d come home to my ceiling on the floor because the sheetrock at the edge of the vent had started to swell and curl back, with what looked like black mold growing through it. I don’t even want to think what the inside looked like!
So we were kind of going into this whole moving thing with the thought that they’d let us out of our month-to-month contract with very limited time since they needed to repair the ceiling before they could rent it out. Right?
Well, yes and no. It took some negotiating (and sharing of the above photo), but they finally agreed to let us out on December 1st. Yep. So here we are, the day before Thanksgiving, and I now have 8 days to pack and move out. Oh joy! I didn’t even have moving boxes!! Needless to say, the last week of November was a nightmare. I was packing and moving things over to the new place in between sleeping and working my graveyard shift. Out of sheer coincidence, I’d gotten the 30th of November off for a girls’ trip we were taking down south, which ended up getting cancelled last minute. Thank goodness! Because when we started moving out the large furniture pieces in our bedroom We found a fuzzy, black mold colony. Behind where our dresser and bed were. I even tried to clean some of it up when we moved out and spent a day cleaning, but I did not have the right cleaners to combat that at all. We found a similar, smaller spot in the back of the closet behind where we kept the electric and acoustic guitars, too. Weird thing, both corners are on the outside wall of the house. Makes me think maybe the siding was leaking? I don’t know. Anyway, we told the landlord about that when we left. I don’t know how, or if, they fixed it, but the new tenants moved in on the 2nd, and we were gone by the end of the night on the 30th so . . . . best guess there? Probably not.
And then December came and I switched shifts from graves to days, just as my body was finally starting to sleep well during the day. Ugh. This day shift thing is killing me. I have a near-constant headache from the glare from the windows on my computer screens. I need to find my special computer glasses. They’re probably in a box somewhere. Why? because I still have 16 boxes to unpack! Here we are, the middle of January, and I still have boxes that need unpacking. My house is still in complete chaos (hence the no photos yet), and I can’t find anything anywhere because it’s not where I’m used to it being. But, we’re in a 3 bed, 1 bath and it has tons of storage and I find myself wondering daily how I ever managed to fit all this crap into 900 square feet.
Oh, but we did get a new member of our family, so it’s all good! We adopted a kitten from a local shelter. I told my husband if we ever got a cat it needed to meet three criteria: be a female, be a black cat, and be a rescue. Her name is Sabrina (Brina for short) and she is the sweetest dang thing ever. She is very loving and social, but she does well being left alone while everyone is at school or work. Santa Paws even brought her some toys for her Christmas stocking.
Mr M has been having some anxiety issues, and it really seems like the cat has helped that a lot, too – at least, according to the school counselor’s notes.
And that puts us to here, mid-January. Halfway through my stint on days, in a new house, with a new kitten, with a bunch of new goals. But don’t worry, I won’t get into that here!
Thanks for reading. And, if you’ve stuck with me this far, I’d love to hear what your New Year’s Resolutions are! I’ll be doing a different post on mine, but let’s hear yours in the comments, okay?
Holy cow, it’s been a while! July and August just flew by. Honestly though, I was working a lot, and playing even more!! We went on vacation, and had some pretty big family stuff going on (nothing serious or sad – all happy stuff, I promise!!) that the blog just kind of slipped to the back burner. I’m so sorry!!
So, here’s my update in a nutshell:
JULY:
24th – Fiesta Days parade (our local town celebration, which also happens to be on Pioneer Day in Utah), family party with a foam machine and food (duh!), and fireworks.
AUGUST:
Family trip to Bear Lake, Idaho – during Raspberry Days in Garden City, Utah. It was so much fun! 3 days at the lake, 1 day roadtrippin’ up to Idaho Falls to shop and go to the zoo (and eat the best sushi ever at Blue Hashi – seriously, get the Sleepwalker roll. You’ll thank me later), and then home with a quick stop for a birthday dinner with family on the way.
Back to SCHOOL!! The kids are finally back in school. Miss B, my 6-year-old, is in 1st grade this year. All day school is a hard adjustment for her, but we’ll get there. She has all the friends and so much fun, I can just tell it’s a little draining. We went back to school shopping at Kohl’s the Friday before school started because both kids went through growth spurts. Miss B’s jeans were suddenly floods (she now wears a size 7!! Where has my baby gone?!) and Mr. Marshmallow’s pants were too tight in the butt (he has graduated from a 10 slim to a regular 10!!).
Back to School Med Check – Mr. Marshmallow takes ADHD medicine (NO, I’m not interested in how your oils will help him get off his meds, or how this new diet/food supplement/vitamin could help his body regulate it better than medications. We’re good.), so he has to go to the doctor every 3 months to make sure he’s still growing (weight and height) and that his vitals are at a normal level. This time we went up 3 pounds! This was a huge deal for him, because usually we’re up 1 or 2 if he’s lucky. But 3? Winner winner!
Back to School Eye Exams – Mr. Marshmallow still needs glasses (figures he’d get my genetically bad eyesight! Sorry kiddo!). His Rx didn’t change much, about what you’d expect for a year, so we’re good. We put new lenses in his frames. Miss B, however, is a totally different story! Last year, we went to the mall – my old stomping grounds and former place of employment. Now, since I was an A.B.O certified Optician 10+ years ago, I still remember a thing or two, so it’s hard to pull a fast one on me at the sales floor. However, I’m not an optometrist. So, when he wrote Miss B an Rx for a +1.50 -1.00 x whatever-the-number-was for her right eye, and a plano (no Rx) for her left, I didn’t bat an eye. I figured the Dr. went to school for these things and he knew best. Except last year she hated wearing her glasses. This year, we went to a local optometrist who is actually about 3 blocks from our house. His daughter goes to school with my kids. He’s a really great guy. He started from scratch with Miss B, and found that she has a slight astigmatism (like, we’re talking -0.25 correction for astigmatism ONLY) in each eye, and that no distance correction was needed. This was a HUGE jump from the Rx we got last year. I even told him so. He was very surprised that the Dr. we saw even wrote that Rx. And then, he surprised me by saying “You don’t need to get her glasses unless her schoolwork starts to slip and she starts to struggle. She’ll probably be fine for at least a few years before she needs any correction.” WHAT?! I mean, you live off glasses sales, right? But clearly this guy is the bomb-dot-com because he isn’t going to sell me glasses she DOESN’T need. Best. News. Ever.
And finally, a little personal update…..
I’ve decided that I’m not happy the weight I am. I won’t divulge that number, but just know that it’s the heaviest I’ve been in 13 years. I’ve always been “overweight” as far as BMI is concerned. In fact, for my height, the upper end of the “normal” section of the BMI chart is 135 lbs. HA! Isn’t that ridiculous? Anyway, I knew I needed a change. We’ve done keto on and off for the past 5 years. We were doing keto before it was “super cool” and “everyone was doing it.” I knew I wanted to get back in it, but I’ve always struggled sticking with it. But, I also have between my oldest child and a small teenager to lose, so I figured I needed a plan. I searched the interwebs, and found this Egg Fast from I Breathe I’m Hungry. She pretty much spells it out for you. Make sure if you do the egg fast that you read all of her disclaimers at the top because, true story, I literally didn’t want to eat another egg by the middle of day 3. But, I stuck it out, didn’t drink ANY soda (and I don’t drink coffee either, so I subbed bulletproof cocoa for the bulletproof coffee), suffered through the eggs, and ended up down 8.3 pounds by the end of day 7!! I was stoked, and well on my way towards my goal.
So what am I doing now that the egg fast is over (thank goodness – because I was starting to emanate the scent of eggs wherever I went. It was bad)? Well, I’m on to the next diet plan: the 5-day Keto Soup Diet. So far, so good. The soup is pretty tasty. She allows for you to have a snack after lunch, but I was so full from my breakfast and lunch meals that I didn’t feel like I needed it. Honestly, I didn’t really want to skip it, but the thought of eating more food when I wasn’t hungry made me ill.
*GASP*
Who is this person I’ve become in just 1 short week?! There was once a time I’d order the extra large chips & queso (with extra queso, natch) from Costa Vida and eat it ALL GONE after eating my large sweet pork salad with black beans ALL GONE – including the tortilla dipped in extra ranch. Yep, that’s how I got here. But now, I’m 1 week in and thinking “Nah, I don’t need that extra food. I’m fine.” WHAT? Yep. True Story.
So – Wish me luck! I’ll keep you updated! And hopefully, I’ll be able to post more frequently!!
Here in Utah, we like to celebrate America for the entire month of July. Actually, we have Pioneer Day on July 24th, but we keep all of our Americana decor up all month to celebrate.
Pioneer Day celebrates the day when the pioneers arrived in Utah and settled the area. In the city I live in, we also have our annual city celebration: Fiesta Days. So it’s like double celebrations.
Each summer I usually buy my kids a patriotic outfit to wear during the July celebrations in town. This year I couldn’t find anything that I loved, so I didn’t get anything for the 4th of July for my kids to wear (plus, my son was at Stadium of Fire in his scouting uniform, so he wouldn’t have gotten to wear it anyway).
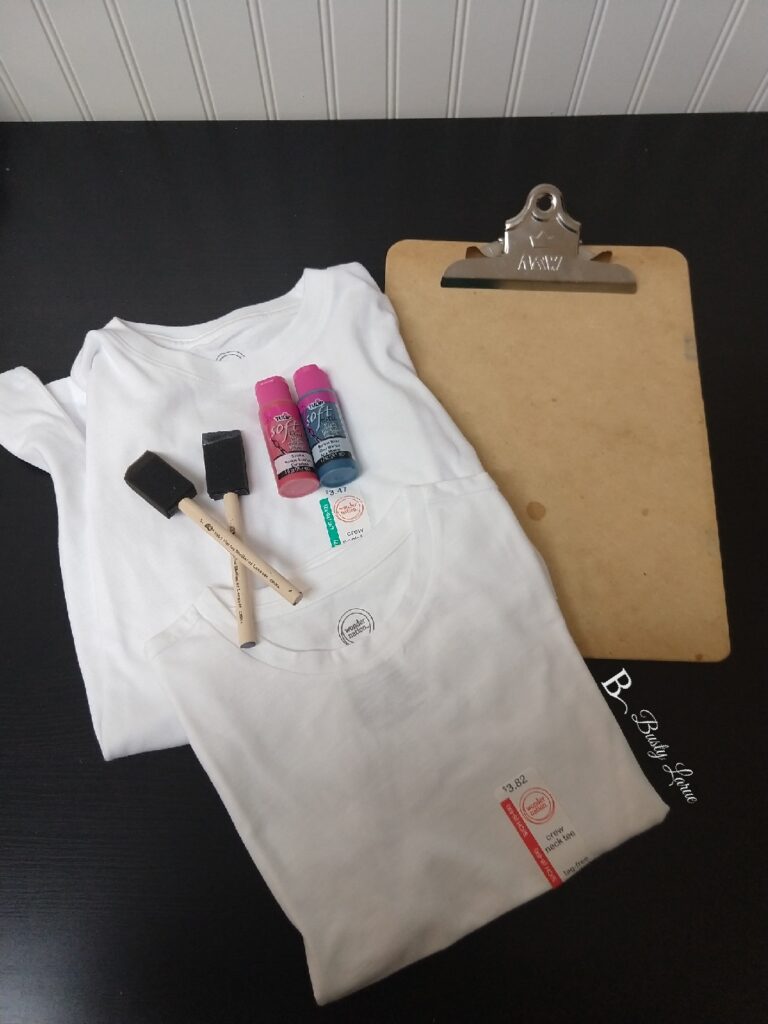
About 4 years ago, I saw a photo of a cute fabric painted t-shirt someone had made for their child. It looked easy enough, and I’d just gotten a Silhouette Cameo so I made my own using a vinyl sticker. I made them large, so they could grow into them. Well, my kids are small-ish, and so they just barely outgrew them this last winter! I figured, it was time to pull out the fabric paint and make them again! My current laptop doesn’t have my Silhouette Cameo software on it yet, so I had to figure out a work around. I’ve used freezer paper before in a pinch, so that’s what I did (see below) this time.
SUPPLIES:
Solid color t-shirt in your child’s size
Fabric paint in red and blue (you can add in white if you’re doing a shirt colored other than white)
Foam paint brushes
Cardboard or something to put in the shirt so the paint doesn’t bleed through
Freezer Paper
A few notes about the supplies I used:
I bought my t-shirts from Walmart. They are tagless, Wonder Nation brand. I paid less than $4 each at the time of purchase. They feel really nice, and I’ve always been pleased with the Wonder Nation quality since Walmart picked up this brand.
I used Tulip brand fabric paint. I’ve used it before, and it washes well.
I used a clipboard to separate the layers of my t-shirts. The paint will bleed through a little, so you don’t want it to get on the back of the shirt. A piece of cardboard, cereal box, whatever you have will work fine for this, though. It just happens that is what I had lying around at the time.
PREPARING THE T-SHIRTS
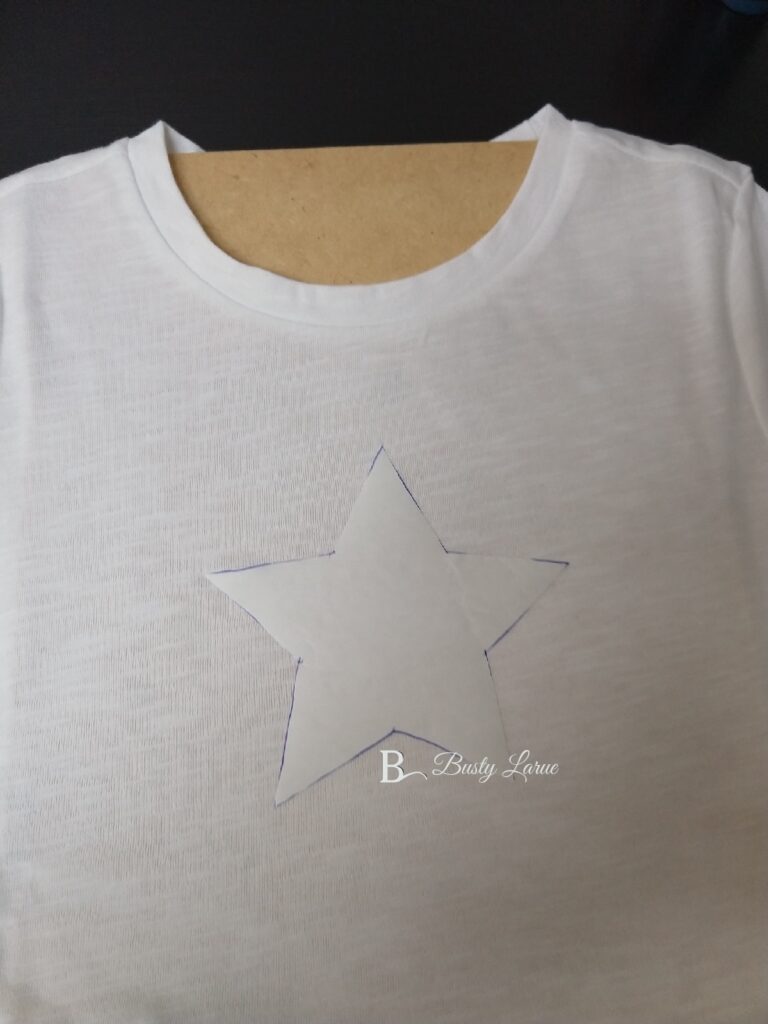
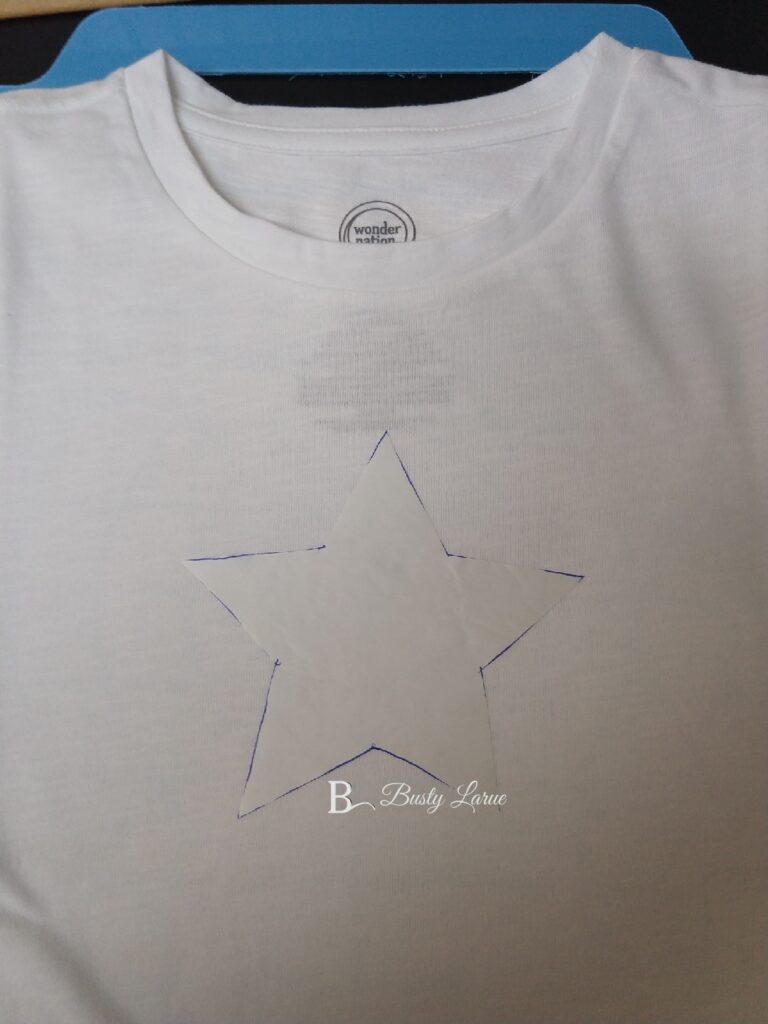
First, you need to cut out a star shape from the freezer paper. You can print out a clip-art online or freehand it yourself.
Like I said earlier, the last time I made these I used my Silhouette Cameo and cut out star shapes from vinyl. This was super fast and easy, but if you don’t have that option, freezer paper is a great substitute.
Iron the star onto the front of the shirt where you want it.
Make sure you iron the shiny side down. This will adhere the paper to the fabric while you’re painting.
Insert the cardboard or clipboard into the shirt to separate the front from the back and prevent bleed through.
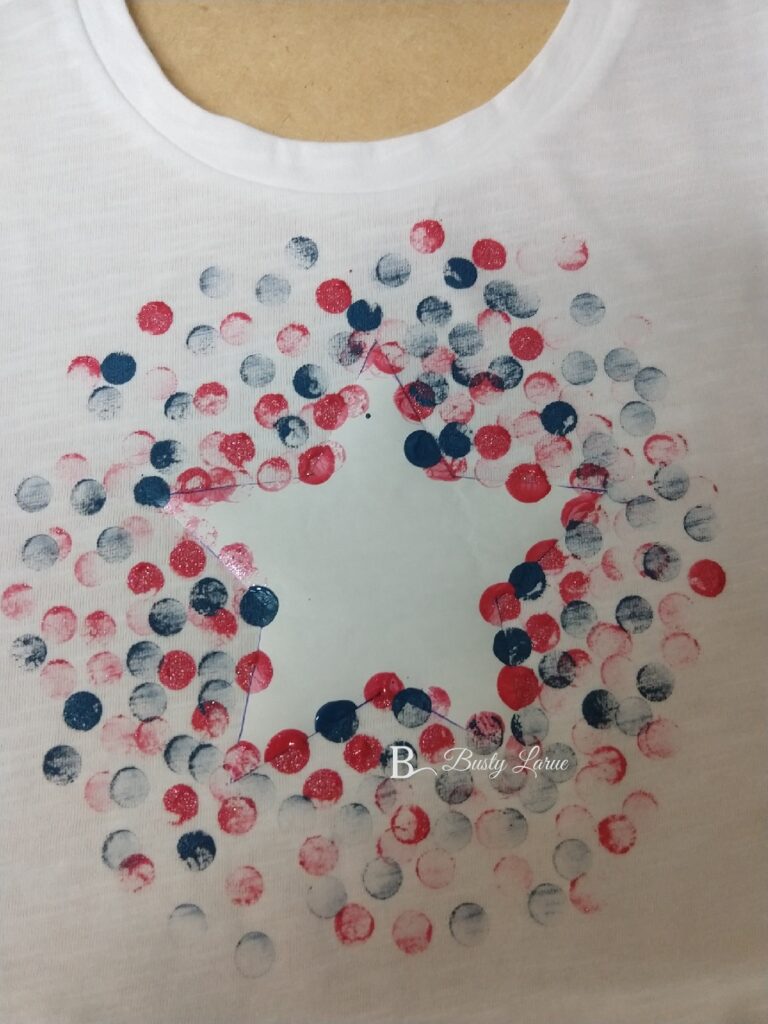
PAINTING THE T-SHIRTS
Using the bottom end of a foam paintbrush (or anything small and round that you have on hand), dab it in the first color and then dot it across the t-shirt.
Make sure you do a few dots along the edge of the star – you’ll see why in a mintue!
Using your other brush, repeat step 1 with the remaining color.
I like to do heavier dots with thicker paint along the edges of the star, then bloom outwards getting fainter and farther apart for a dispersed effect.
NOTE: Follow your fabric paint’s instructions for setting the paint. Tulip brand says to let it dry for 4 hours and then wash inside out after 72 hours.
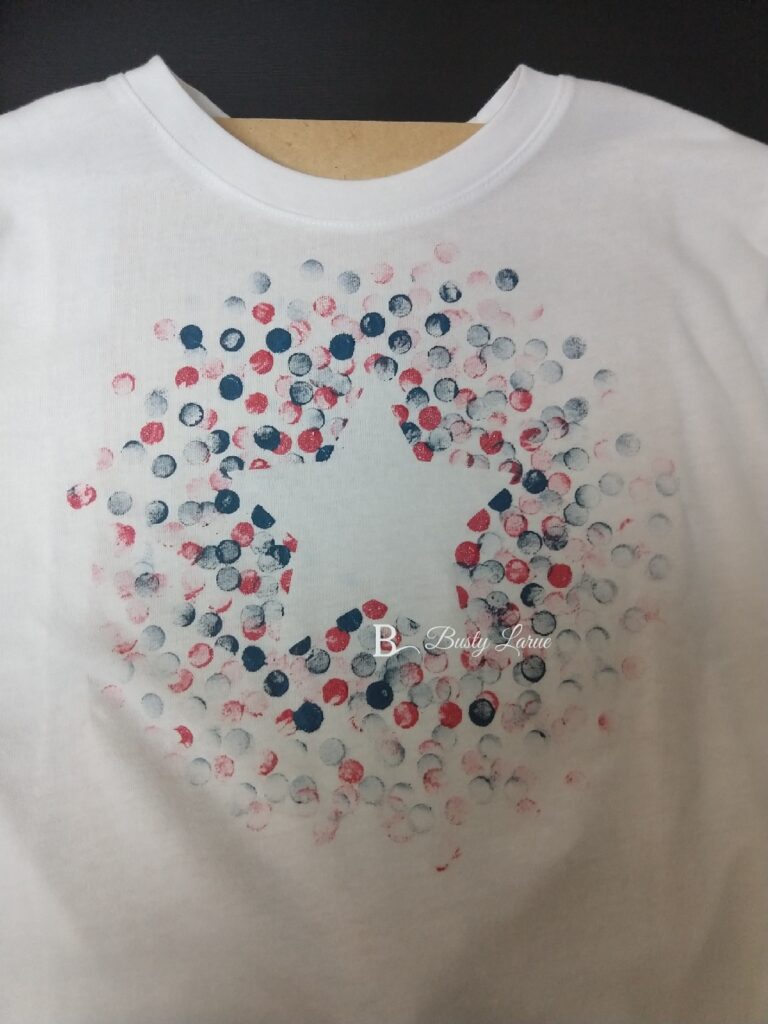
This is the hardest step by far: LET THE PAINT DRY COMPLETELY before taking the freezer paper off the shirt. Peel the freezer paper off, and then you’re good to go.
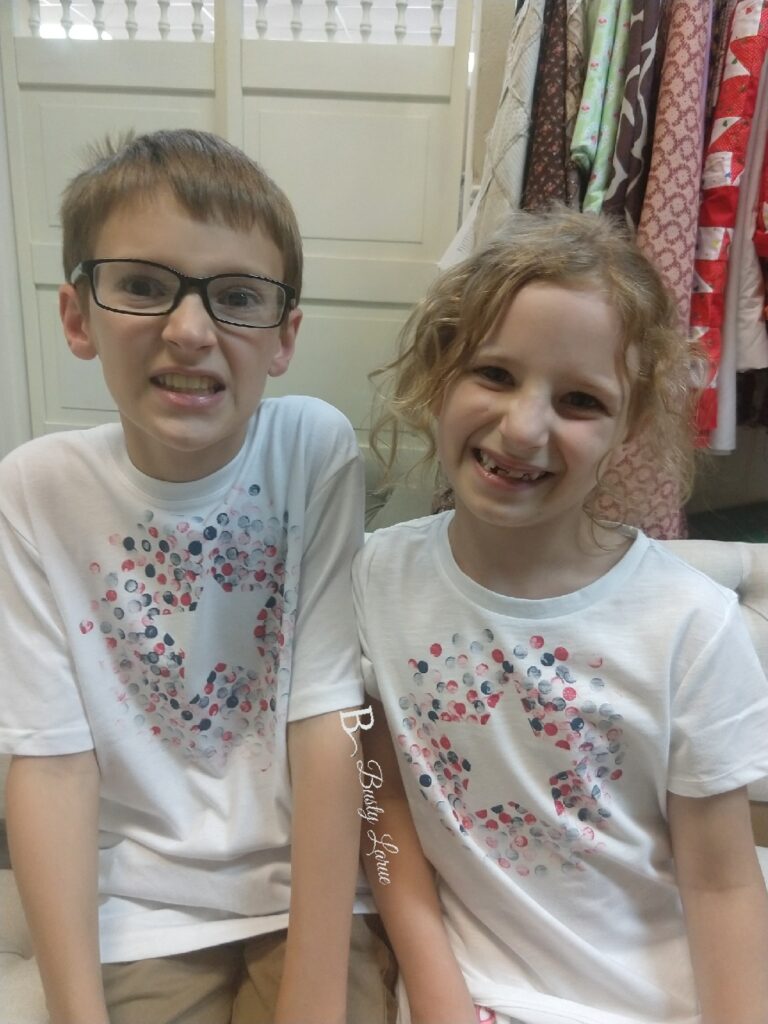
Don’t my kiddos look so excited to be wearing their new, matching shirts?! I love this technique. It’s super easy, and you can do it with any shape. I think I might make some with pumpkins for Halloween!
What shapes do you want to see me try? What holiday should I do next? Vote in the comments!
Remember how earlier I was saying that I get free products and test things out from various sites. Well, on Ripple Street you apply to host a party, or be a Chatterbox, and then you complete activities to show your interest. I’ve already completed all of my activities for the Kikkoman Kids’ Cooking Party, but my 6-year-old daughter really wanted to make something! So, we downloaded a recipe for Terriyaki Meatballs from Kikkoman’s website to try out.
First, we gathered the ingredients. Our local grocer doesn’t carry Kikkoman Panko (what?!) so we had to substitute, but we were able to find the Kikkoman Teriyaki Takumi Original sauce. Also, the pineapple was optional, but we added it in for some extra sweetness.
Hands washed. Aprons on. We are ready!
Miss B did a great job stirring the Panko breadcrumbs, Soy Sauce (we used Tamari), and 1 egg together. Mom added in the pineapple and the ground beef and stirred it up with her hands. Is anyone else grossed out by raw meat? I hate it. But meatballs had been promised and so I took one for the team.
Miss B didn’t want to get her hands dirty, so we used a large cookie scoop to scoop the meat out of the bowl and place on our baking sheet (lined with tin foil for super easy clean up). Once the meatballs were all on the tray, Mom formed them into better looking balls and made sure they were spaced evenly on the baking sheet.
The recipe says to bake for 12 mintues at 375 F, but our oven is off a little so we ended up baking them for 14 minutes. They turned out great! After they come out of the oven, we put the Kikkoman Teriyaki Takumi Original sauce in a bowl and mixed the meatballs into it, making sure each ball had sauce on it. It smelled so good!
We made 18 meatballs. Depending on the size you make them, you could probably make more (I think we made ours a little bigger than 1 inch like the recipe says). My kids are kind of picky eaters, so they don’t eat much food. You could easily serve these with stir fry veggies and rice and heat up some sauce to go over everything. We just did the meatballs.
The kids gobbled them up! I think we have a winner here!! We’ll definitely be making this again in the future with veggies and rice.
What’s your favorite food to cook with teriyaki sauce? And is there a Kikkoman product you’ve tried that you absolutely love? Post about them in the comments!!
I’m always looking for a super fun, super easy craft for my kids to do. Sometimes, though, we get started and then I realize it isn’t as super fun or as super easy as I thought it would be. This is one of those crafts. In theory, it looked fun and easy, but in reality, there was a lot of waiting time and it was pretty involved as far as parental supervision would be concerned. I’m kind of glad I did a trial run of this one, for sure!
I’ve seen several tutorials online for pieces similar, but I decided to do mine a little differently. Here’s how I made my Wavy Sticks American Flag!
SUPPLIES:
Wavy Craft Sticks – you’ll need 8 to complete this project
Craft Paint in Red, White, and Blue
Paint Brushes
Wooden Craft Star
Hot Glue Gun
A few notes on the supplies:
I bought everything for this project at Walmart. It was pretty cheap.
The most expensive items were the wavy craft sticks ($3) and the wooden craft stars (around $2-3, if I remember right)
PAINTING THE CRAFT STICKS
You’ll need 6 of the wavy sticks.
Paint 3 white
Paint 1 red
Paint the other 2 half red, half blue – but WAIT! More instructions to follow on this one!
Paint the craft star white
MAKING THE FIELD OF BLUE
Line up the 3 sticks that will be half blue and half another color (red or white).
Eyeball where you want your field of blue to end.
If you want it to be exact, you can use a ruler and measure, but I just drew a line approximately where I wanted it to go that was close on all 3 sticks.
Paint the left half of these sticks blue, and the right half either red or white.
If you painted 3 sticks white, as in the steps above, just add another coat of white on.
The paint I used said to wait 1 hr between coats, but I really probably only waited about 30 minutes. I did a total of 3 coats. Be careful when you paint the field of blue to make sure that you keep the line fairly even across all three sticks.
It’s starting to come together now! This is where I let everything dry overnight, or if you’re doing this in the afternoon, at least a few hours. You want it to be super dry when you hot glue on the back supports. But, before we can glue the supports on, we have to measure them!
MAKING THE BACK SUPPORTS
Line your sticks up the way they’re going to be when you put it all together.
Alternate red and white stripes, and make sure you have the blue on the left side!
Lay another stick next to the flag. This is your back support
Mark just above the bottom of the last wavy stick. You don’t want your support sticks hanging out from behind.
Cut off the excess at the line you marked.
Now we’re going to hot glue them together. If you don’t want much of the back supports showing through (since we didn’t paint them at all), then you’ll want to make sure you’re gluing them on at the fat part of the curvy sticks.
This is really important: MAKE SURE YOUR BLUE IS ON THE CORRECT SIDE WHEN YOU START GLUING!! (Yes, I may have had a mini heart attack when I started because I thought I did it backwards.) When you’re done, it’ll look like this:
Glue the white star onto the field of blue. Once the glue is dried, you’re done!
There are lots of ways you can hang this. If you want a fun decoration for your fridge, I’d recommend gluing 2 magnets onto the support sticks on the back. Or, you can glue a small dowel across and tie some jute/twine around it to hang. Me? I just hung mine on a little nail I had in my wall.
It’s definitely a fun craft, but one that the kids probably wouldn’t stick with through to the end. All that waiting for paint to dry will probably drive my kiddos crazy, so I won’t be making more of these for them. But, I now have a fun flag to hang on my wall! Have you tried this craft, or something similar? I’d love to hear about them in the comments!